

Installing Solar in California: Timeline, Permits, Equipment Choices, and Real-World Results (What I Learned in 2025 That Matters Even More in )
TL;DR: I installed solar in California in 2025, before tax credits ended. What I learned matters even more in . The hardest parts were not installation, but timing, installer selection, permitting, and system design. For homes with shading or limited winter sun, battery strategy and peak-hour avoidance mattered far more than adding panels. This article walks through the real timeline, permits, PG&E interconnection, inverter choices, and first-year results—based on lived experience.
Most solar content stops once pricing is discussed. Very little content explains what actually happens after you decide to move forward—how long things take, what decisions really matter, and where time and money are quietly lost.
I installed my solar system in 2025, when federal tax credits were still available. But the process, tradeoffs, and lessons from that experience are even more relevant in , now that incentives are gone and California solar economics are less forgiving.
This article is a personal, real-world walkthrough of my installation in California: the timeline, permitting, installer selection, equipment decisions, design tradeoffs, and first-year production results—including where expectations broke down and what ultimately made the system financially workable.
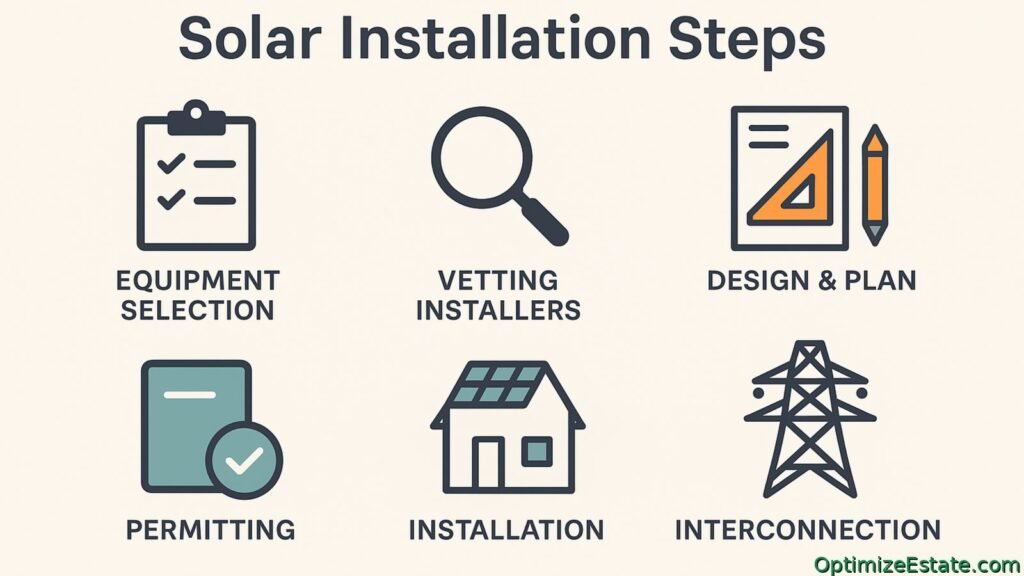
What the solar installation timeline actually looks like (and where time is really spent)
One of the biggest misconceptions about solar is that installation is either instant or endlessly delayed. In reality, the physical installation is short. Most time is spent on research, coordination, and paperwork.
Here is what my actual timeline looked like in 2025:
- Equipment selection and ordering: 4–6 weeks
- Vetting installers (electricians): 3–4 weeks
- System design and plan drawings: 2–3 weeks
- Permitting in Contra Costa County: ~3 weeks (no revisions, all online e-permit)
- Installation on site: 3–7 working days
- County inspection: 1 day
- PG&E interconnection approval: ~4 weeks (did not impact operation)
On paper, this looks long. In practice, many steps ran in parallel. For example, installer vetting can happen while equipment is shipping; design work often starts before all equipment arrives; and PG&E interconnection paperwork can be submitted as inspection completes.
With the right sequencing and preparation, much of this timeline can realistically be cut in half.
The premium guide captures the lessons I learned so you don’t need to spend months researching, coordinating logistics, or second-guessing decisions. It reflects a system that is already working reliably in the real world, with timing and dependencies figured out ahead of time.
Vetting installers in 2025: why install-only is hard to find (but essential)
This was the most time-consuming part of the process.
In the 2025 market, most solar installers carry and sell their own equipment. That’s where a large portion of their margin comes from. As a result, many installers are not interested in projects where the homeowner supplies equipment.
In my case, I reached out to more than 50 installers in the Bay Area. Fewer than 10 were willing to consider install-only work.
Those who were open to it were typically not operating the full-service sales model. Instead, they were repair-focused solar electricians, contractors servicing systems after full installers went out of business, or technicians familiar with older or semi-DIY installations.
Even within that smaller group, pricing varied widely. Some install-only quotes were still so high that they effectively recreated the same economics as bundled full-service installers.
I ultimately narrowed it down to three installers who met all of the following:
- Reasonably priced for labor only
- Reputable, with multiple years of solar experience
- Familiar with the inverter and battery brands I purchased
- Willing to work with homeowner-supplied equipment and drawings
The premium guide includes verified contact details for three Bay Area installers serving Oakland, Berkeley, San Francisco, and surrounding areas who were willing to take on new system installations—not just repair work—under this structure.
I expect this part of the market to change significantly after . As incentives disappear and margins tighten, weaker full-service installers will likely exit the market. Existing systems will still require maintenance and repair, and demand will grow for pure installers and repair-focused electricians. This creates a growing niche for homeowners who are not DIY electricians but want to eliminate unnecessary sales, marketing, and bundled markup to make solar numbers work.
Permitting in Contra Costa County: simpler than expected
In Contra Costa County, the permitting process was far more straightforward than I expected.
- The entire process was handled online using the county e-permit system
- No office visits were required
- Approval took about three weeks with no revisions
- Inspectors focused on safety, labeling, and clearances—not energy modeling
Contra Costa County—including cities such as Walnut Creek, Lafayette, and Concord—uses a centralized, online solar permitting system.
The permit fee itself was modest relative to total system cost. The real risk was missing or unclear documentation, not complexity. Once installation was complete, inspection took one day and was uneventful.
Official References & Verification:
- Contra Costa County Solar Permitting Portal — Official e-permit requirements for residential PV systems.
- PG&E Net Billing Tariff (NEM 3.0) Overview — Current utility rates and export credit structures for 2026.
PG&E interconnection: paperwork, not a blocker
PG&E interconnection tends to generate anxiety, but in practice it was largely administrative.
- The system can operate before export approval
- Export is disabled while waiting, but self-consumption works normally
- Interconnection is submitted entirely online
- Approval took about four weeks
Because export value under NEM 3.0 (which began in 2023) is low, waiting for interconnection approval did not meaningfully impact system value or usability.
Microinverters vs hybrid inverters with optimizers: what worked for my home
One of the most important design decisions was inverter architecture.
Microinverters:
- One inverter per panel
- Each panel operates independently
- Shading on one panel does not affect others
- Higher upfront cost
- More complex and expensive battery integration
Hybrid (string) inverters with panel-level optimizers:
- Panels wired in strings
- Each panel has its own optimizer
- Panel-level maximum power point tracking and rapid shutdown
- Shading impact is significantly reduced, though panels remain part of a string
- Cleaner and more cost-effective battery integration
With a pure string inverter (no optimizers), shading on one panel can reduce output across the entire string. Optimizers largely mitigate this by allowing each panel to operate closer to its own optimum—even when neighboring panels are shaded.
Optimizers do not make a string system identical to microinverters. Panels are still electrically connected. But for many partially shaded roofs, the performance difference is small enough that the cost premium of microinverters is difficult to justify.
Because my home has partial shading, uneven winter sun exposure, and required tight battery integration, a hybrid inverter with panel-level optimizers ended up being the best balance.
Real production numbers: my extreme summer vs winter reality
My production profile is not typical, and that’s important to state clearly.
My home sits below a hill, which dramatically affects winter sun exposure:
- Summer: ~70 kWh per day average
- Winter: often under 10 kWh per day
This is an extreme seasonal swing. In winter, the sun is low enough that panels are frequently shadowed by terrain—even with tree trimming.
Because of this, adding more panels would mostly increase summer surplus while winter production would remain constrained. Exporting excess energy has limited value under NEM 3.0 (effective since 2023). This made my solar investment less financially effective in winter unless paired with a strong battery strategy.
Why avoiding peak hours mattered more than winter production
Since winter production was so limited, the only way to make the system financially viable was to eliminate PG&E peak-hour usage, especially in winter.
By correctly sizing and configuring batteries, I was able to:
- Completely avoid grid usage from roughly 3 p.m. to 9 p.m.
- Eliminate the most expensive electricity entirely
- Reduce my PG&E bill by roughly 50%, even during winter
For homes like mine, the value is not how much electricity is produced, but which electricity is never purchased.
What this experience means for homeowners installing solar in
Solar in still works—but only when expectations are grounded in reality.
- Timelines are manageable with proper sequencing
- Permitting and interconnection are administrative, not technical
- Installer selection is the hardest and most important step
- Inverter architecture matters in shaded homes
- Winter production can be severely limited by geography
- Battery strategy can rescue financial performance when solar output is weak
The premium guide documents exact sequencing and timelines, equipment models and pricing, battery sizing for peak-hour avoidance, and Contra Costa permitting + PG&E interconnection steps—so homeowners don’t have to learn these lessons the hard way.
Advanced Guides & Deep Dives
If you want the full “how it actually works in real life” details behind this—timelines, permitting friction, equipment choices, and cost-structure decisions—start with these deeper guides:
Solar in Without Tax Credits: How to Control Cost, Avoid PG&E Peak Pricing, and Still Save Money
Best if you want the bigger picture on batteries, peak avoidance, and electrification (EVs, heat pumps, hot water) under PG&E time-of-use pricing.
Cut Solar Costs 40–60% in : Why Structure Matters More Than Tax Credits
Best if you’re optimizing ROI: equipment sourcing, install-only cost structure, and why battery-first design matters more than panel count.
Frequently Asked Questions
Does PG&E interconnection approval stop me from using my solar system?
No. In most PG&E installs, your system can run in self-consumption mode before export permission is finalized. While you wait, export is typically disabled, but you can still produce solar and use it in the home (and charge batteries if you have them). Under NEM 3.0, exports are usually low value anyway, so the practical ROI impact is often smaller than people fear—as long as your design is built around peak-hour avoidance.
How long does a real solar install take in the Bay Area if I use an install-only electrician?
It depends. A real-world schedule often looks like: 4–6 weeks for equipment ordering, 3–4 weeks to vet install-only electricians, 2–3 weeks for design/plan drawings, about ~3 weeks for Contra Costa e-permit (if your package is clean), and 3–7 working days on-site. Many steps can run in parallel, so the calendar time can shrink if you sequence correctly (order equipment early, start drawings while shipping, and prep the permit package before the electrician’s first site day).
Is microinverter better than a hybrid inverter with optimizers for shaded roofs?
It depends. Yes, microinverters isolate each panel, so partial shading impacts less of the system. But a hybrid (string) inverter with panel-level optimizers often gets you “close enough” performance for many shaded roofs, while making battery integration cleaner and more cost-effective. If your priority is peak-hour avoidance under PG&E TOU (often 3–9pm) and you want strong battery control, hybrid + optimizers can be the better overall system architecture even if microinverters win on pure panel-level isolation.
Do batteries matter more than adding panels in California under NEM 3.0?
Yes—often. Under NEM 3.0, exporting extra solar to the grid is typically low value compared to offsetting high-cost peak kWh you would otherwise buy from PG&E. In real homes with shading, limited winter sun, or steep seasonal swings, batteries can “rescue” ROI by shifting solar into the 3–9pm window and reducing peak purchases. The key is sizing and configuring batteries around your TOU plan and your household load profile, not just adding panel wattage.
Is permitting in Contra Costa County hard for solar?
No, not usually. Contra Costa solar permitting is often administrative when your drawings, labels, and equipment spec sheets are complete. Many homeowners report the process is fully online via e-permit, with approval around a few weeks if no revisions are needed. Inspectors typically focus on safety items (labeling, disconnects, rapid shutdown, clearances) rather than “energy modeling.” The biggest risk is missing documents or unclear plan sets, not technical complexity.